Samba AD DC HOWTO (日本語)
Sambaを Active Directory互換ドメインコントローラとしてセットアップする方法
このドキュメントではMicrosoft Active Directory互換、特にドメインログオンのようなサービス用途で、Active Directoryドメインに参加済みのMicrosoft Windowsクライアントから利用するためのドメインコントローラとして動作する、簡単なSambaサーバーをセットアップする方法を説明します。 今後この機能については略して AD DCと称します。
HOWTO to set up Samba as an Active Directory compatible Domain Controller
This document explains how to setup a simple Samba server as an Domain Controller compatible with Microsoft’s Active Directory, for use particularly by Microsoft Windows clients that are joined to the Active Directory Domain, for services such as Domain Logon. We refer to this capability as being an AD DC for short.
この利用方法のデモ動画
この利用方法の概要を掲載した 動画デモが利用でき、理解の手助けになるかもしれません。
Video Demonstrations of This HOWTO
A set of demonstration videos is available that may provide a useful overview of the contents of this HOWTO.
バージョンについての注意
Sambaは高速に開発をすすめています。
この利用方法は Samba gitリポジトリへの最終更新の内容を反映するために頻繁に更新されます。
リリース計画のさらなる詳細についてはSamba4.0 Release Planningを参照してください。
A Note on Versions
Samba is developing rapidly. This HOWTO is frequently updated to reflect the latest changes in the Samba git repository. Please see the Samba 4.0 Release Planning more specifics on the release planning.
Samba OS 要件
Linuxの絶え間ない進化と変更のため、Samba4のOS要件は Step 2から Samba_4/OS_Requirementsに移されました。
これには、Samba AD DCの配置に成功させるための必須パッケージ群だけでなく、要求されるファイルシステムの機能も含まれます。
上記のページが、Samba AD DC セットアップを成功させるための必要条件と考えてください。
Samba OS Requirements
Because of the constantly changing and ever expanding nature of Linux, the OS Requirements for Samba4 have been moved from Step 2, to Samba_4/OS_Requirements This not only includes the required packages for a successful Samba AD DC deployment, but also the required file system features. Please consider that page as a prerequisite to a successful Samba AD DC setup.
Step 1: Sambaのダウンロード
今のところ現行のSambaのソースをダウンロードするには3つの手段があります、最新安定版のtarballまたはgitかrsync経由で開発バージョンソースです。もし開発バージョンで作業し、問題解決のためにコードの変更を望むのであればgitを使用してSambaをダウンロードすると素早く更新でき問題が発生した場合にSamba開発者達からのテストパッチの統合が簡単なのでこちらをお勧めします。
以降の例では、あなたの環境のソースの最上位ディレクトリは「samba-master」という名前であると仮定します。もし tarballをダウンロードして作業を行う場合この名前はダウンロードしたtarballの名前に基づいて読み替えてください( たとえば tarballが samba-4.0.0.tar.gzという名前であれば、 samba-4.0.0と読み替えます)。 また masterブランチの samba4コードは、我々の現行 git ツリーのトップレベルディレクトリに今はあります。
tarballのダウンロード
リリース版の Samba 4.0を利用したいのであれば、Samba websiteから最新版の Samba 4.0 tarballをダウンロード可能です。
gitからダウンロード
Gitは gitプロトコルまたは httpプロトコル経由でソースをダウンロードすることができます。通常はデータが圧縮されて転送できる gitプロトコルが好ましい選択となります。git経由でソースツリーをダウンロードするには次のコマンドを実行します:
$ git clone git://git.samba.org/samba.git samba-master
あるいは、httpプロトコルを使用したい場合は次のコマンドを実行します:
$ git clone http://gitweb.samba.org/samba.git samba-master
いずれのコマンドでも samba-masterディレクトリがカレントディレクトリに作成されます。
gitから更新する
もしすでに git経由でソースツリーをダウンロードしていてツリーを最新に更新したい場合は、次のコマンドを samba-masterディレクトリで実行します:
$ git pull
次のようなエラーが起きた場合:
fatal: Unable to create '[...]/samba_master/.git/index.lock': File exists.
この後に示すコマンドを、あなたのツリーをリセットするために実行します。 もしソースのコンパイルで問題が発生しているのなら、それは最新でないファイルのせいかもしれません。これらのエラーをリセットするために gitツリーをリセットすることができます。あなたの gitツリーをリセットするには次のコマンドを samba-masterディレクトリで実行します:
$ git clean -x -f -d
rsyncを使ってダウンロード
もし gitが利用できないのであれば、rsyncがその次に最善の手段となります。rsyncでソースツリーをダウンロードするには、次のコマンドを実行します:
$ rsync -avz samba.org::ftp/unpacked/samba_4_0_test/ samba-master
このコマンドは チェックアウト済み gitリポジトリを含む samba-masterディレクトリをカレントディレクトリに作成します。ツリーの管理に gitを使用するつもりなら、 samba-masterディレクトリで次のコマンドを実行する必要があるでしょう:
$ cd samba-master/
$ rm .git/refs/tags/*
$ rm -r .git/refs/remotes/
$ git config remote.origin.url git://git.samba.org/samba.git
$ git config --add remote.origin.fetch +refs/tags/*:refs/tags/* (this line is optional)
$ git fetch
補足 git fetchからのエラーは無視してください:
error: refs/heads/master does not point to a valid object!
エラー: refs/heads/master は正しいオブジェクトを参照していない!
gitでソースツリーを管理する方法については
gitから更新するを参照してください。
Step 1: Download Samba
Currently, there are three methods to download the current Samba sources, either as a tarball of the latest stable release, or a development version via git or rsync. If you hope to work with the team on a development version to resolve issues you may hit via code changes, we recommend using the git method for downloading Samba, as it makes getting updates easier, and also allows you to integrate test patches from Samba developers more easily in case of problems. In the following examples we will assume that your top-level source is named samba-master. If you downloaded a tarball this will instead be based on the name of the tarball downloaded (e.g. samba-4.0.0 for the tarball samba-4.0.0.tar.gz). Also note that in the master branch the samba4 code in our current git tree is now located in the top level directory.
Downloading a tarball
If you wish to use a released version of Samba 4.0, you can download the latest Samba 4.0 tarball from the Samba website
Downloading via git
Git allows you to download the source tree via either the git or httpprotocols. In general, the git protocol is the preferred choice since it compresses the data being transferred. To download the source tree via git, run the following command:
$ git clone git://git.samba.org/samba.git samba-master
Alternatively, if you prefer to use the http protocol, run the following command:
$ git clone http://gitweb.samba.org/samba.git samba-master
Either command will create a directory called samba-master in the current directory.
Updating via git
If you already have downloaded the source tree via git and want to update the tree to the latest version, run the following command in your samba-master directory:
$ git pull
If you get an error like this: fatal: Unable to create ‘[…]/samba_master/.git/index.lock’: File exists. Run the command below to reset your tree. If you are having trouble compiling the source, it may be due to stale files. You can reset your git tree to correct these errors. To reset your git tree, run the following command in your samba-master directory:
$ git clean -x -f -d
Downloading via rsync
If git is not available to you, rsync is the next best choice. To download the source tree via rsync, run the following command:
$ rsync -avz samba.org::ftp/unpacked/samba_4_0_test/ samba-master
This command will create a directory called samba-master in the current directory, containing a checked out git repository. If you plan on using git to manage the tree, you will need to run the following commands in your samba-master directory:
$ cd samba-master/
$ rm .git/refs/tags/*
$ rm -r .git/refs/remotes/
$ git config remote.origin.url git://git.samba.org/samba.git
$ git config --add remote.origin.fetch +refs/tags/*:refs/tags/* (this line is optional)
$ git fetch
Note you can ignore this error from git fetch:
error: refs/heads/master does not point to a valid object!
Refer to the Updating via git instructions on how to manage the source tree with git.
Step 2: Sambaのコンパイル
Sambaをビルドするには次のコマンドを samba-masterディレクトリで実行します:
$ cd samba-master
$ ./configure --enable-debug --enable-selftest
$ make
上記のコマンドは Sambaを /usr/local/samba にインストールするよう設定します。もし Sambaを他のディレクトリにインストールしたい場合、configureで –prefix オプションを使用する必要があります。
Sambaで--enable-debug --enable-selftestの使用を推奨する理由は、インストール失敗時に開発者による問題解析に役立つ追加のデバッグ情報が含まれるようになり、あなたの環境で Sambaが正しく動作するか検証するためのテストを作成する自己テストを動作させられるようにします。しかしながらこの双方ともまったくのオプションです(省略することもできます)。
google-perftoolsによるプロファイリング
プロファイリングのサポートを有効にする場合、先ほどの configureコマンドを次のように変更する:
$ LDFLAGS="-ltcmalloc -lprofiler" ./configure.developer
(これは CFLAGSにも作用します)
Step 2: Compile Samba
To build Samba, run the following command in your samba-master directory:
 $ cd samba-master
 $ ./configure --enable-debug --enable-selftest
 $ make
The above command will setup Samba to install in /usr/local/samba. If you want Samba to install in a different directory, then you should use the –prefix option to configure. The reason we recommend using –enable-debug –enable-selftest for Samba is that it will include extra debug information that will help us diagnose problems in case of failures, and will also allow you to run our selftest make test to validate that Samba can behave correctly on your platform. Both of these are however, entirely optional.
Profiling with google-perftools
If you want to enable profiling support, change the configure command above to the following:
$ LDFLAGS="-ltcmalloc -lprofiler" ./configure.developer
(This also works for CFLAGS)
Step 3: Sambaのインストール
Sambaをインストールするには、次のコマンドを samba-masterディレクトリで実行します:
$ make install
これはインストールディレクトリ(デフォルトは /usr/local/samba)に対して書き込み権限を持つユーザーで実行しなくてはならないことに注意してください。インストールディレクトリを変更する方法については
Step 2: Sambaのコンパイルを見てください。 今後この HOWTOでは、Samba4を既定の場所にインストールすると仮定します。これから先の Samba コマンドは /usr/local/samba/sbin および /usr/local/samba/bin ディレクトリにあるものとします。 自分のインストールするバージョンの情報をRelease Notesで確認してください。そこにはこの HOWTOに反映されていない重要な情報が掲載されているかもしれません。
アップグレードする
もし以前の Samba 4.x リリースからアップグレードする場合、新しいバージョンまでの間の全ての
Release Notesを確認してください、
Step 3: Install Samba
To install Samba, run the following command in your samba-master directory:
$ make install
Note that this must be run as a user who has permission to write to the install directory, which defaults to /usr/local/samba. See Step 2: Compile Samba4 for instructions on how to change the install directory. For the rest of this HOWTO we will assume that you have installed Samba4 in the default location. All future Samba commands will stem from the /usr/local/samba/sbin and /usr/local/samba/bin directories. Please review the Release Notes for the version you have installed, it may contain important information not yet reflected in this HOWTO.
Upgrading
If you are upgrading from a previous release of Samba 4.x, be sure to review all the Release Notes for the new version, as well as the notes for all the interim versions.
Step 4: Sambaの準備
準備(provision)ステップでは、基本ユーザデータベースと、Samba4サーバーを独自のドメインとして使用するときのためのセットアップを行います。もしSamba4サーバーを既存ドメインの追加ドメインコントローラとして使用したい場合は、このページの
Windowsドメインコントローラーを追加の DCとして参加させる セクションを参照してください。 もし既存の Samba 3.xドメインをAD DCな Samba 4.0 にマイグレートしたいなら、このページの 既存の Samba 3ドメインをSamba 4へマイグレートセクションを読んでください。 この HOWTOの残りの部分では DNSドメイン名は samdom.example.com 、(NT4で知られるような)短いドメイン名は samdom 、Sambaサーバーのホスト名は samba そしてSambaサーバーのIPアドレスは 192.168.1.2 だと仮定します。 準備(provision)ステップはインストールディレクトリに書き込み権限のあるユーザで実行してください。
# /usr/local/samba/bin/samba-tool domain provision
これは対話式の provisionツールを実行します。realmには samdom.example.com のような値を使用し、domainには(提案されるであろう) samdom といった値を使用します。 このコマンドをインストールディレクトリに対して書き込み権限のないユーザーで実行した場合、次のようなエラーが表示されるでしょう:
tdb_open_ex: could not open file /usr/local/samba/private/sam.ldb.d/DC=SAMDOM,DC=EXAMPLE,DC=COM. ldb: Permission denied
samba-tool domain provision コマンドに対して pass オプションを指定することができます。–helpオプション付きで実行するとそれらの一覧を表示することができます。
- メモ:2012/9/11 (Samba4.0.0RC1) 現在 provisionコマンドは Sambaの内部 DNSサーバーを使用します、もし古いバージョンように動作してほしい場合、 –dns-backend=BIND9_DLZ を前述の provisionコマンドに追加してください。
- メモ:provisionコマンドを再実行する場合、 /usr/local/samba/etc/smb.conf ファイルを取り除く必要があるかもしれません。
- メモ:もし –adminpass=’password’ スイッチを利用した場合、パスワードの複雑性条件に気づくかもしれません、provision中のなにか変ったエラーが発生した場合、’Pa$$w0rd’のようなもう少し複雑なパスワードを試してみてください。
Step 4: Provision Samba
The provision step sets up a basic user database, and is used when you are setting up your Samba server in its own domain. If you instead want to setup your Samba server as an additional domain controller in an existing domain, then please see the
Joining a Windows Domain Controller as an Additional DC in a Domain section on this page. If you want to migrate an existing Samba 3.x domain to Samba 4.0 as an AD DC, see the Migrating an Existing Samba 3 Domain to Samba 4 section on this page. For the rest of the HOWTO we will assume that your DNS domain name is samdom.example.com, your short (also known as NT4) domain name is samdom, your Samba server’s hostname is samba, and the IP Address of your Samba server is 192.168.1.2. The provision step must be run as a user with permission to write to the install directory.
# /usr/local/samba/bin/samba-tool domain provision
This will run the provision tool interactively. For realm use something like samdom.example.com, for domain (it should suggest this) use samdom. If you run the previous command with a user who does not have write permission to the install directory, you will get an error similar to this:
tdb_open_ex: could not open file /usr/local/samba/private/sam.ldb.d/DC=SAMDOM,DC=EXAMPLE,DC=COM. ldb: Permission denied
You can pass options to samba-tool domain provision command. You can run it with the –help option to see a list of them. Note: As of September 11, 2012 (Samba4.0.0RC1) the provision command now uses Samba’s internal DNS server, if you would like the older behavior, add –dns-backend=BIND9_DLZ to the above provision command. Note: You may need to remove the /usr/local/samba/etc/smb.conf file if you are re-running the provision command. Note: If you use the –adminpass=’password’ switch, be aware that there are password complexity requirements, so if you are getting some odd error with provision, try a more complex password ie. ‘Pa$$w0rd’
Step 5: SambaをAD DCとして開始する
もし製品用途のサーバとしてSamba4を実行するつもりなら、root権限で samba バイナリを実行するだけです。
# /usr/local/samba/sbin/samba
これにより Sambaは製品用途に適した、’standard(一般)’ モードで開始されます。Sambaは各プラットフォーム向けのinitスクリプトをまだ含んでいませんが、あなたのプラットフォーム用にそれを作成するのは難しいことではありません。
Samba4/InitScriptページにいくつかのサンプルスクリプト( RedHat/Fedora, Debianと Ubuntu)があります。 開発者としてSamba4を実行させたいのであれば、次のようにするとさらに便利でしょう:
# /usr/local/samba/sbin/samba -i -M single
これは sambaをすべてのログを標準出力(stdout)に出力させつつ、さらに単一のプロセスに制限して起動します。このモードで動作させると gdbで sambaがデバッグしやすくなります。gdb下で起動したい場合は、次のように sambaを起動します:
# gdb --args /usr/local/samba/sbin/samba -i -M single
Samba3のsmbdやnmbdのプロセスを実行している場合、Samba4の samba を起動する前にそれらのプロセスを停止しておく必要があることに注意してください。 Sambaコマンドを実行する際、以前のバージョンの Sambaがインストールされていないか注意してください。不注意により間違ったバージョンを実行することを避けるために、 /usr/local/samba/bin および /usr/local/samba/sbin がPATH環境変数の先頭に記述するように検討してください。 PATH環境変数の下になにかしらの Sambaが存在すれば、次のコマンドで Sambaのバージョンを確認できます:
# samba -V
Step 5: Starting Samba as an AD DC
If you are planning to run Samba as a production server, then just run the samba binary as root
# /usr/local/samba/sbin/samba
That will run Samba in ‘standard’ mode, which is suitable for production use. Samba doesn’t yet have init scripts included for each platform, but making one for your platform should not be difficult. There are some example scripts (for RedHat/Fedora, Debian and Ubuntu) on the Samba4/InitScript page. If you are running Samba as a developer you may find the following more useful:
# /usr/local/samba/sbin/samba -i -M single
This will start samba with all log messages printed to stdout, and restricting it to a single process. That mode of operation makes debugging samba with gdb easier. If you want to launch it under gdb, run samba as follows:
# gdb --args /usr/local/samba/sbin/samba -i -M single
Note that if you are running any Samba 3 smbd or nmbd processes they need to be stopped before starting samba from Samba 4. Take care when running Samba commands if you also have a previous version of Samba installed. To avoid inadvertently running the wrong version, you should consider putting the /usr/local/samba/bin and /usr/local/samba/sbin directories in the beginning of your PATH variable. You can see what version of Samba, if any, is in your PATH variable by running the following:
# samba -V
Step 6: AD DCの Sambaをテストする
最初に次のコマンドで実行される smbclientが正しいバージョンか確認します:
$ /usr/local/samba/bin/smbclient --version
これにより”Version 4.0.XXXXX”というようなバージョン番号が表示されるでしょう。 そしてこのコマンドを実行してこの Sambaサーバーが共有しているものを一覧表示します:
$ /usr/local/samba/bin/smbclient -L localhost -U%
コマンドの出力結果は以下のようなものになるでしょう:
       Sharename       Type      Comment
       ---------       ----      -------
       netlogon        Disk
       sysvol          Disk
       IPC$            IPC       IPC Service (Samba 4.0.0)
netlogon共有と sysvol共有は、Active Directoryサーバーの作動に必要な基本共有です。 コマンドが失敗する場合は、次のコマンドを実行することで sambaを再起動します:
# killall samba
# rm -v -- /usr/local/samba/var/run/smbd-fileserver.conf.pid
# /usr/local/samba/sbin/samba
認証機能が動作していることを確認するために、netlogon共有に先ほど設定した Administratorパスワードで接続してみてください:
$ smbclient //localhost/netlogon -UAdministrator%'p4$$word' -c 'ls'
コマンドの出力結果はいかに示すようなものになるでしょう:
Domain=[SAMDOM] OS=[Unix] Server=[Samba 4.0.0beta9-GIT-e4677e3]
  .                                   D        0  Wed Sep 12 21:00:36 2012
  ..                                  D        0  Wed Sep 12 21:02:28 2012
Step 6: Testing Samba as an AD DC
First check you have the right version of smbclient by running the following command:
$ /usr/local/samba/bin/smbclient --version
This should show you a version starting with “Version 4.0.XXXXX”. Now run this command to list the shares on your Samba server:
$ /usr/local/samba/bin/smbclient -L localhost -U%
The output of the command should be similar to what is shown below:
       Sharename       Type      Comment
       ---------       ----      -------
       netlogon        Disk
       sysvol          Disk
       IPC$            IPC       IPC Service (Samba 4.0.0)
The netlogon and sysvol shares are basic shares needed for Active Directory server operation. If the command failed, restart samba by running the following:
# killall samba
# rm -v -- /usr/local/samba/var/run/smbd-fileserver.conf.pid
# /usr/local/samba/sbin/samba
To test that authentication is working, you should try to connect to the netlogon share using the Administrator password you set earlier:
$ smbclient //localhost/netlogon -UAdministrator%'p4$$word' -c 'ls'
The output of the command should be similar to what is shown below:
Domain=[SAMDOM] OS=[Unix] Server=[Samba 4.0.0beta9-GIT-e4677e3]
  .                                   D        0  Wed Sep 12 21:00:36 2012
  ..                                  D        0  Wed Sep 12 21:02:28 2012
Step 7: DNSを設定する
DNS設定作業はSamba4を正しく動作させるために欠くことができません。正しいDNSエントリなしにkerberosは動作せず、それはつまりSambaの多くの基本機能が動作しないことを意味します。 DNSの設定が正しいことを保証するために多少の時間を割くことは、あとになってDNS設定のミスを大量の時間を使ってデバッグすることを思えば十分価値のあることです。
DNS サーバー
Samba内臓のDNSサーバー
もし 準備(provision)の際に –dns-backend=SAMBA_INTERNAL を指定していたか、いかなるバックエンドも指定していない場合、DNSサーバーの設定に関して追加で行うことはありません。 しかしながら、以前 /etc/resolv.conf を
/etc/resolv.conf を設定するで示すように設定する必要があります。 もし内臓 DNSサーバーに責任範囲外のリクエストを他に転送してほしい場合、smb.confに次のような設定を追加します。
dns forwarder = {IP-Address of the DNS you want to forward to}
警告: もし X Windowsが起動している場合、ネットワークマネージャーはおそらく dnsmasqを起動するでしょう、ログをチェックして、このような行がないか確認してください:
Failed to bind to 0.0.0.0:53 TCP - NT_STATUS_ADDRESS_ALREADY_ASSOCIATED
これを無効化する必要があるなら、 /etc/NetworkManager/NetworkManager.conf を好きなエディタでroot権限で開き、dns=dnsmasq の行をコメントアウトしてください、そして network-manager を再起動します。
Bind 9.8.0 以降
BINDを利用しているなら、 Sambaのために動作するDNSを手に入れるための次のステップは、
provision ステップ作成されるDNS設定ファイルか、 もし他の samba-tool オプション(たとえば classicupgrade)を使っている場合は –dns-backend=BIND9_DLZ か –dns-backend=BIND9_FLATFILE で指定可能なDNS設定ファイルと行います。 BINDの named設定ファイルにこの設定を含めることで、provisionが作成した設定を有効化することができます。このファイルは普通 /etc/bindディレクトリにありますが、あなたのシステム上ではどこになるかは使っているLinuxディストリビューションのドキュメントを参照してください。みつけたら、その設定ファイルに次の行を追加します。
include "/usr/local/samba/private/named.conf";
そのファイルを編集して、あなたのBindのバージョンに応じた正しいdlz plugin の行をコメント解除して下さい。 /usr/local/samba/private/named.conf ファイルをテキストエディタで開いて、中の指示に従ってください。 行を追加したら、Bindサーバーを再起動して、システムログを確認し、問題が発生していないことを確認しましょう。 可能なら、named-checkconf を実行することで、namedの設定における問題の修正の手助けになります。
Bind 9.7.x
Bind-9.7.x のユーザーには、bind-9.8または bind-9.9へのアップグレードを強く奨励します。もしそれが無理なら、bind-9.7での設定構築のために
Configure Kerberos DNS Dynamic Updatesセクションを参照してください。
Bind (全バージョン)
あなたが遭遇するかもしれない共通の問題として、最近の Linuxディストリビューションの多くは ‘Apparmor’ または ‘SELinux’ をデフォルトで有効化していて、これらはBindが named.confとゾーンファイルへアクセスできないように設定しているかもしれないことです。もし BindのログにBindがそれらのファイルに対しるアクセス拒否エラーが見られたら、ローカルシステムのドキュメントを参照して、Bindからこれらのファイルにアクセス可能にする方法を見つけてください。(ヒント: Ubuntuなどの Apparmorシステムでは、 aa-logprof コマンドが役に立つかもしれません)。
- メモ: Debianシステムでは、ゾーン自動生成が、127.0.1.1をドメインコントローラのIPアドレスとして検出し使用している可能性があります。これはクライアントマシンからサーバーに接続を試みるときに問題を引き起こすことになるでしょう。これを修正するには、 127.0.1.1からサーバーの実際のIPアドレスを反映されるように /usr/local/samba/private/named.conf を調整する必要があります。
- メモ: Debian SID (bind9 パッケージ)において、 /etc/bind/named.conf.optionsが存在せず、さらにはnamedデーモンが起動失敗となるかもしれません。この問題を修正するには、空のファイルを作成するか、 /etc/bind/named.confの対応する行をコメントアウトします。さらなる情報のために syslogメッセージを確認してください。
/etc/resolv.conf を設定する
すべてのローカルDNSの検索が正しく解決するために、サーバーの /etc/resolv.confファイルを変更する必要があります。次の例は適切にDNSを決定できるように手直しする必要があります:
domain samdom.example.com
nameserver 192.168.1.2
メモ: あなたのSambaサーバーの IPアドレスにする事を忘れないでください。 メモ: もしあなたのサーバーが DHCPから IP設定を受信して設定されている場合、 /etc/resolv.confファイルは自動更新されてしまう可能性があります。自分のディストリビューションのドキュメントを参照し、この振る舞いを無効化する方法を参照してください。
DNSをテストする
DNSが正しく動作することをテストするには、次のコマンドを実行し、出力されている内容を比べてみます:
$ host -t SRV _ldap._tcp.samdom.example.com.
_ldap._tcp.samdom.example.com has SRV record 0 100 389 samba.samdom.example.com.
$ host -t SRV _kerberos._udp.samdom.example.com.
_kerberos._udp.samdom.example.com has SRV record 0 100 88 samba.samdom.example.com.
$ host -t A samba.samdom.example.com.
samba.samdom.example.com has address 10.0.0.1
(コマンドからの)回答は上記のもののようになるはずです(コマンドや結果のDNSドメイン名やホスト名はあなたの環境に合わせて見てください)。もしなにかしらエラーが発生した場合、問題を突き止めるためにシステムログを注意深く確認して下さい。
Step 7: Configure DNS
A working DNS setup is essential to the correct operation of Samba. Without the right DNS entries, Kerberos won’t work, which in turn means that many of the basic features of Samba won’t work. It is worth spending some extra time to ensure your DNS setup is correct, as debugging problems caused by mis-configured DNS can take a lot of time later on.
DNS Server
Samba’s Internal DNS Server
If you specified –dns-backend=SAMBA_INTERNAL or did not specify any backend at all when you provisioned, there is no further setup required for the DNS server. However, you still need to configure your /etc/resolv.conf as shown in Configure /etc/resolv.conf If you want the internal DNS server to forward requests it isn’t responsible for, then add the following to your smb.conf:
dns forwarder = {IP-Address of the DNS you want to forward to}
Warning: If you are running X windows on your machine, networkmanager could be spawning dnsmasq, check the logs for lines like:
Failed to bind to 0.0.0.0:53 TCP - NT_STATUS_ADDRESS_ALREADY_ASSOCIATED
If you need to disable this you can open /etc/NetworkManager/NetworkManager.conf in your favorite editor as root, and comment out the line dns=dnsmasq, then restart network-manager
Bind 9.8.0 or newer
If using BIND, the next step to get a working DNS setup for Samba is to start with the DNS configuration file that is created by the provision step or if you are using any of the other samba-tool options (classicupgrade for example) you can specify –dns-backend=BIND9_DLZ or –dns-backend=BIND9_FLATFILE. You can activate the configuration that the provision has created by including this configuration file in bind’s named configuration file. This file is typically located in the /etc/bind directory, please refer to your distribution documentation for the location of this file on your system. Once located, add the following line to the configuration file:
include "/usr/local/samba/private/named.conf";
Edit that file to uncomment the correct dlz plugin line, based on your version of bind. Open the /usr/local/samba/private/named.conf file in a text editor and follow the instructions inside. After adding that line you should restart your Bind server and check in the system logs for any problems. If available, you can run named-checkconf to help you fix any problems with your named configuration.
Bind 9.7.x
Users of bind-9.7.x are strongly encouraged to upgrade to bind-9.8 or bind-9.9. If this is not possible, refer to the section Configure Kerberos DNS Dynamic Updates for instructions on configuring bind-9.7.
Bind (All Versions)
A common problem you may encounter is that many modern Linux distributions activate ‘Apparmor’ or ‘SELinux’ by default, and these may be configured to deny access to Bind for your the named.conf and zone files created in the provision. If your Bind logs show that Bind is getting a access denied error accessing these files, please see your local system documentation for how to enable access to these files in Bind (hint: for Apparmor systems such as Ubuntu, the command aa-logprof may be useful). Note: On Debian systems, the zone auto-generation might detect and use 127.0.1.1 as the domain controller’s IP address. This will cause problems when trying to connect to the server from client machines. To fix this, you will need to adjust /usr/local/samba/private/named.conf by changing 127.0.1.1 to reflect the actual IP address of the server you’re setting up. Note: On Debian SID (bind9 package), /etc/bind/named.conf.options is missing and this will cause the named daemon to fail to start. To fix this either create an empty file, or comment out corresponding line in /etc/bind/named.conf. See your syslog messages for more information.
Configure /etc/resolv.conf
For all the local DNS lookups to resolve correctly, we need to modify the server’s /etc/resolv.conf file. The following example should be sufficient to have DNS resolve properly:
domain samdom.example.com
nameserver 192.168.1.2
Note: Remember to change the IP Address to your Samba server’s IP Address Note: If your server is set up to receive its IP configuration via DHCP, the /etc/resolv.conf file might be automatically updated. Refer to your distribution’s documentation on how to stop this behavior.
Testing DNS
To test that DNS is working properly, run the following commands and compare the output to what is shown:
$ host -t SRV _ldap._tcp.samdom.example.com.
_ldap._tcp.samdom.example.com has SRV record 0 100 389 samba.samdom.example.com.
$ host -t SRV _kerberos._udp.samdom.example.com.
_kerberos._udp.samdom.example.com has SRV record 0 100 88 samba.samdom.example.com.
$ host -t A samba.samdom.example.com.
samba.samdom.example.com has address 10.0.0.1
The answers you get should be similar to the ones above (adjusted for your DNS domain name and hostname). If you get any errors, carefully check your system logs to locate the problem.
Step 8: Kerberosを設定する
Kerberosの設定は krb.conf (または krb5.conf)ファイルによって制御されます。このファイルは通常 /etcディレクトリに配置されます、ディストリビューションのドキュメントを参照してあなたのシステム上ファイルの位置を確認してください。既存のファイルがもしあったら、 /usr/local/samba/share/setup/krb5.conf のサンプルと置き換えます。ファイルを編集して ${REALM} を先述の provisionコマンドで –realmパラメータなどで指定した値に置き換えます。 その際 realmは
大文字で入力するようにしてください:
[libdefaults]
    default_realm = SAMDOM.EXAMPLE.COM
    dns_lookup_realm = false
    dns_lookup_kdc = true
Kerberosをテストする
一番単純なテストは kinitコマンドを以下のように使うことです:
$ kinit administrator@SAMDOM.EXAMPLE.COM
Password:
- メモ: ドメインの realmにあたる、 SAMDOM.EXAMPLE.COM は大文字で指定します。 kinitはなにも出力しません。 Kerberosが動作しているか、チケットを受信したか確認するために、以下を実行します:
$ klist
Ticket cache: FILE:/tmp/krb5cc_1000
Default principal: administrator@SAMDOM.EXAMPLE.COM

Valid starting     Expires            Service principal
02/10/10 19:39:48  02/11/10 19:39:46  krbtgt/SAMDOM.EXAMPLE.COM@SAMDOM.EXAMPLE.COM
もし kinitや klistがシステムに存在しないなら、
Samba_4/OS_Requirementsの必要パッケージのインストール方法を参照してください。 リモートクライアントからも Kerberosのテストをすることができます、しかし先にクライアントのkrb5.confおよび resolve.confを前に示したように設定しなくてはなりません。
* メモ: もし NAT越しのクライアントを使用しているなら、ドメインコントローラサーバーの krb5.confファイルに次のように追加してください:
[kdc]
    check-ticket-addresses = false
- メモ: provisionでパスワードが生成され、それを忘れた場合や、保存する手段がなかった場合、 root権限で “samba-tool user setpassword administrator” を実行して それをりっせっとすることができます。
- 訳注: krb.confか krb5.confかはディストリビューションに依る?
Step 8: Configure Kerberos
Kerberos configuration is handled by the krb.conf file. This file is typically located in the /etc directory, please refer to your distribution documentation for the location of this file on your system. Replace the existing file, if any, with the sample from /usr/local/samba/share/setup/krb5.conf. Edit the file and replace ${REALM} with the value you chose for the –realm parameter of the provision command above, make sure to enter the realm in
uppercase letters:
[libdefaults]
    default_realm = SAMDOM.EXAMPLE.COM
    dns_lookup_realm = false
    dns_lookup_kdc = true
Testing Kerberos
The simplest test is to use the kinit command as follows:
$ kinit administrator@SAMDOM.EXAMPLE.COM
Password:
- Note: You must specify your domain realm SAMDOM.EXAMPLE.COM in uppercase letters
kinit will not give you any output. To verify that Kerberos is working, and that you received a ticket, run the following:
$ klist
Ticket cache: FILE:/tmp/krb5cc_1000
Default principal: administrator@SAMDOM.EXAMPLE.COM

Valid starting     Expires            Service principal
02/10/10 19:39:48  02/11/10 19:39:46  krbtgt/SAMDOM.EXAMPLE.COM@SAMDOM.EXAMPLE.COM
If either kinit or klist do not exist on your system, refer to Samba_4_OS_Requirements on how to install the necessary packages. You can also test Kerberos form a remote client, but you must first configure the client’s krb5.conf and resolve.conf as shown previously.
- Note: If you are using a client behind NAT then you have to add the following to the krb5.conf on the domain controller server:
[kdc]
    check-ticket-addresses = false
- Note: If provision generated you a password and you forgot it or didn’t get it saved in some way, you can use “samba-tool user setpassword administrator” as root to reset it.
Step 9: Kerberos経由のDNS動的更新の設定
Sambaには、Kerberosを通して自動的に Bindゾーンファイルを更新する能力があります。このステップは省略できるとは言え、これは強く推奨されます。 Samba内臓DNSサーバーを使用する場合、設定は特に必要ありません、そしてこのステップをスキップすることができます。 動的DNS更新をするには、比較的新しい版の Bindをインストールしておく必要があります。少なくともバージョン 9.8.0以降をインストールしておくことを強く推奨します。このバージョンには動的DNS更新をより強固で簡単に設定するための Sambaチームからのパッチが取り入れられています。以降の説明では Bind 9.7.2と Bind 9.8.0の両方の説明を掲載しますが、できる限り9.8.0以降を利用してください。 どのバージョンのbindを利用しているかは、 /usr/sbin/named -V コマンドで知ることができます。もしOSに bind-9.8.0以降が含まれていない場合、サードパーティから提供されているパッケージの取得を検討してください(たとえば、 Ubuntuでは新しいバージョンの Bindの ppa (Personal Package Archives)が利用可能です)。
Bind 9.8.0以降
bind-9.8.0以降を利用している場合、Bind設定ファイルのoptionsセクションに次のように追加します:
options {
 [...]
 tkey-gssapi-keytab "/usr/local/samba/private/dns.keytab";
 [...]
 };
このファイルは通常 /etc/bind ディレクトリに存在します、自分にシステム上どこに存在するかは各ディストリビューションのドキュメントを参照してください。
Bind 9.7.x
bind-9.7.x (具体的には 9.7.2以降)の場合、まずは bind-9.8にできないかどうか考えてみてください。 いくつか問題がおきることになるでしょう。 さもなければ以下の説明に従ってください。 Samba provisionはカスタム設定ファイルを /usr/local/samba/private/named.conf に作成しています。設定ファイルを更新しましょう。Samba/Kerberosが自動的にDNSを更新することを許可するためにマスターのnamed.confファイルにこのファイルをインクルードしてください。もしサポートされていないバージョンでこのファイルをインクルードした場合は Bindの起動に失敗しますので気を付けてください。 bind-9.7.xで使用するには、追加で2つの環境変数を設定する必要があります:
 KEYTAB_FILE="/usr/local/samba/private/dns.keytab"
 KRB5_KTNAME="/usr/local/samba/private/dns.keytab"
 export KEYTAB_FILE
 export KRB5_KTNAME
これらは Bind用の設定ファイルに入れなければなりません。 Debian系システム(Ubuntuも含みます)では、これは /etc/default/bind9にあります。RedHatや SUSE由来のシステムでは /etc/sysconfig/named です、自分のディストリビューションでこれらの環境変数を設定すべき正しい場所を確認するために各ディストリビューションのドキュメントを参照してください。 厳密に言えばKEYTAB_FILEかKRB5_KTNAMEのどちらかだけが必要ですが、どちらが必要かはディストリビューションによるので、両方設定しておいたほうが簡単でいいでしょう。 dns.keytabは Bindサーバープロセスから読み取り可能でなければなりません。通常これは以下を実行することで実現します:
$ chown named:named /usr/local/samba/private/dns.keytab
(provisionで自動的に権限設定できればよかったんですが)。
最終的に、次のような内容を bind設定の optionsセクションに追加する必要があります:
options {
 [...]
 tkey-gssapi-credential "DNS/server.samdom.example.com";
 tkey-domain "SAMDOM.EXAMPLE.COM";
 [...]
 };
今示した credential(証明書)部分の最初の行はあなたのサーバー設定の dns名と一致しなくてはなりません。このファイルは通常 /etc/bindディレクトリにありますが、正しい場所はディストリビューションのドキュメントを参照してください。
動的 DNS更新をテスト/デバッグする
Sambaの自動DNS更新を動作させる手段は provisionが生成するであろう、Sambaが起動時および以降10分おきに samba_dnsupdateユーティリティで動的更新を試みるDNSエントリーリストを含む、 /usr/local/samba/private/dns_update_listファイルです。 更新はDNSエントリがまだ存在しない場合のみ発生します。更新をすべてに配布するために Bindの nsupdateユーティリティが必要なことを忘れないでください。 このプロセスをテストまたはデバッグしたい場合、rootでこのように実行します:
/usr/local/samba/sbin/samba_dnsupdate --verbose --all-names
コマンドラインオプションで指定されているのは、dns_update_listのレコードの強制的な更新と、実行されている内容についての詳細な出力です。
Apparmorまたは SELinuxの影響
Apparmorまたは SELinuxを使用している場合、 Bindのプロセスが /usr/local/samba/private/dns.keytabと /usr/local/samba/private/named.conf への読み取り権限、さらに /usr/local/samba/private/dns ディレクトリおよびそのゾーンファイルへの読み書き権限を保証しなければなりません。 Samba provisionはこれらのファイルの正しいパーミッションを設定するよう試みますが、Apparmorや SELinuxのいずれかまたは両方を起動している場合、これらの設定に変更を加える必要があることに気づくかもしれません。 Apparmorを使っている場合、 aa-logprofコマンドは、 Sambaと Bindの設定を終えた後の初回起動後に不足しているパーミッションを追加する時に便利かもしれません。 詳しくは Step 11: Permissions, SELinux Labeling and Policyを参照してください。
Step 9: Configure DNS Dynamic Updates via Kerberos
Samba has the capability to automatically update the bind zone files via Kerberos. While this step is optional, it is highly recommended. If you are using Samba’s internal DNS server, no configuration is needed, and you can skip this step. To setup dynamic DNS updates you need to have a recent version of bind installed. It is highly recommended that you install at least version 9.8.0 as that version includes a set of patches from the Samba Team to make dynamic DNS updates much more robust and easier to configure. In the instructions below we give instructions for both bind 9.7.2 and 9.8.0, but please use 9.8.0 or later if at all possible. You can tell what version of bind you have using the command /usr/sbin/named -V. If your OS does not have bind-9.8.0 or later, then please consider getting it from a package provided by a 3rd party (for example, on Ubuntu there is a ppa available with the newer versions of bind).
Bind 9.8.0 or Later
When using bind-9.8.0 or later you need to add the following to the
options section of your bind config:
options {
 [...]
 tkey-gssapi-keytab "/usr/local/samba/private/dns.keytab";
 [...]
 };
This file is typically located in the /etc/bind directory, please refer to your distribution documentation for the location of this file on your system.
Bind 9.7.x
If you have bind-9.7.x (specifically 9.7.2 or later), then first determine if you can at all possibly run bind-9.8. You will have far fewer problems. Otherwise, follow these instructions. The Samba provision will have created a custom /usr/local/samba/private/named.conf.update configuration file. You need to include this file in your master named.conf to allow Samba/Kerberos DNS updates to automatically take place. Be advised that if you include this file in Bind versions that don’t support it, Bind will fail to start. You additionally need to set two environment variables when using bind-9.7.x:
 KEYTAB_FILE="/usr/local/samba/private/dns.keytab"
 KRB5_KTNAME="/usr/local/samba/private/dns.keytab"
 export KEYTAB_FILE
 export KRB5_KTNAME
These should be put in your settings file for bind. On Debian based systems (including Ubuntu) this is in /etc/default/bind9. On RedHat and SUSE derived systems it is in /etc/sysconfig/named, please refer to your distribution documentation for the correct location to set these environment variables. Strictly speaking you only either need KEYTAB_FILE or KRB5_KTNAME, but which you need depends on your distribution, so it’s easier to just set both. The dns.keytab must be readable by the bind server process. Generally, this is accomplished by executing:
$ chown named:named /usr/local/samba/private/dns.keytab
(the provision should have setup these permissions for you automatically). Finally, you need to add the following to the options section of your bind config:
options {
 [...]
 tkey-gssapi-credential "DNS/server.samdom.example.com";
 tkey-domain "SAMDOM.EXAMPLE.COM";
 [...]
 };
The last part of the credential in the first line must match the dns name of the server you have set up. This file is typically located in the /etc/bind directory, please refer to your distribution documentation for the location of this file on your system.
Testing/Debugging Dynamic DNS Updates
The way the automatic DNS update in Samba works is that the provision will create a file /usr/local/samba/private/dns_update_list, which contains a list of DNS entries that Samba will try to dynamically update at startup and every 10 minutes thereafter using samba_dnsupdate utility. Updates will only happen if the DNS entries do not already exist. Remember that you need nsupdate utility from bind the distribution for all these to work. If you want to test or debug this process, then please run this as root:
/usr/local/samba/sbin/samba_dnsupdate --verbose --all-names
The command line options specified will force an update of all records in the dns_update_list, as well as output detailed information on what is being done.
Interaction With Apparmor or SELinux
If you are using Apparmor or SELinux, you have to ensure that the bind process has read access to the /usr/local/samba/private/dns.keytab file, the /usr/local/samba/private/named.conf file as well as read-write access to the /usr/local/samba/private/dns directory and it’s own zone file. The Samba provision tries to setup the permissions correctly for these files, but you may find you need to make changes in your Apparmor or SELinux configuration if you are running either of those. If you are using Apparmor then the aa-logprof command may help you add any missing permissions you need to add after you start Samba and bind for the first time after configuring them. Please refer to Step 11: Permissions, SELinux Labeling and Policy for more information.
Step 10: NTPの設定 (オプション)
ntpdは署名された ntpをサポートする最近のバージョン(=>4.2.6) のものが必要です。参考までに REHL6および Ubuntu < 11.04 で提供されているバージョンは古いです。Debianの Squeeze(コードネーム)は署名された ntpをサポートしています。
- ntpdを ntp.orgからダウンロードし(md5 sum値と比較し)、コンパイルします(必要に応じて ./configureのパラメータを追加して下さい):
 $ tar -zxvf ntp-4.x.x.tar.gz
 $ cd ntp-4.x.x
 $ ./configure --enable-ntp-signd
 $ make
 $ make install
2a. すでにサポートされたバージョンの ntpdおよび ntp.confを持っているなら、最小構成のために以下の行を追加/調整しなくてはなりません:
 ntpsigndsocket /usr/local/samba/var/lib/ntp_signd/
 restrict default mssntp
2b. 最小/簡易 ntp.confが望ましいなら、ファイルの内容を次のように満たします:
 server 127.127.1.0
 fudge 127.127.1.0  stratum 12
 ntpsigndsocket /usr/local/samba/var/lib/ntp_signd/
 restrict default mssntp
2c. さらに複雑な ntp.confは次のようになります:
 server 127.127.1.0
 fudge  127.127.1.0 stratum 10
 server 0.pool.ntp.org  iburst prefer
 server 1.pool.ntp.org  iburst prefer
 driftfile /var/lib/ntp/ntp.drift
 logfile /var/log/ntp
 ntpsigndsocket /usr/local/samba/var/lib/ntp_signd/
 restrict default kod nomodify notrap nopeer mssntp
 restrict 127.0.0.1
 restrict 0.pool.ntp.org mask 255.255.255.255 nomodify notrap nopeer noquery
 restrict 1.pool.ntp.org mask 255.255.255.255 nomodify notrap nopeer noquery
解説: この設定はクライアントにこの NTPホストから時刻を受信することを許可します、localhostは無制限です、我々が時間を受け取るサーバーは時間を提供する以外なにも許可されません。 ntpdアクセス管理についてのさらなる情報は、http://support.ntp.org/bin/view/Support/AccessRestrictions を見てください。 3. ドメインのメンバーの場合、何も設定する必要はありません。ドメインメンバーはデフォルトで FSMOの PDCロールを持つ DCから時刻を受信するでしょう。
Step 10: Configure NTP (Optional)
You require a recent ntpd version (=>4.2.6) that supports signed ntp. E. g. the version shipped with RHEL6 and Ubuntu < 11.04 are to old. The Ntpd of Debian Squeeze supports signed ntp. 1. Download ntpd from ntp.org (verify md5 sum) and compile it (add additionals ./configure parameters, if needed):
 $ tar -zxvf ntp-4.x.x.tar.gz
 $ cd ntp-4.x.x
 $ ./configure –enable-ntp-signd
 $ make
 $ make install
2a. If you already have a supported ntpd version and ntp.conf, you have to add/adjust only the following lines for minimal:
 ntpsigndsocket /usr/local/samba/var/lib/ntp_signd/
 restrict default mssntp
2b. If a minimal/simple ntp.conf is fine for you, then fill the file with the following:
 server 127.127.1.0
 fudge 127.127.1.0  stratum 12
 ntpsigndsocket /usr/local/samba/var/lib/ntp_signd/
 restrict default mssntp
2c. A more complex ntp.conf is the following:
 server 127.127.1.0
 fudge  127.127.1.0 stratum 10
 server 0.pool.ntp.org  iburst prefer
 server 1.pool.ntp.org  iburst prefer
 driftfile /var/lib/ntp/ntp.drift
 logfile /var/log/ntp
 ntpsigndsocket /usr/local/samba/var/lib/ntp_signd/
 restrict default kod nomodify notrap nopeer mssntp
 restrict 127.0.0.1
 restrict 0.pool.ntp.org mask 255.255.255.255 nomodify notrap nopeer noquery
 restrict 1.pool.ntp.org mask 255.255.255.255 nomodify notrap nopeer noquery
For explanation: This config allows clients to receive time from this NTP host, localhost doesn’t have any restrictions, and the servers we receive the time from ,are not allowed to do anything else than providing the time to us. For mor information about ntpd access controll, see http://support.ntp.org/bin/view/Support/AccessRestrictions 3. On members of the domain you don’t have to configure anything. Per default they will receive the time from the DC that has the FSMO role PDC.
Step 11: パーミッション、SELinuxのラベル付けとポリシー
これらの説明は RedHat 6.X向けのものですが、他のディストリビューションやバージョンのためのガイドにもなるかもしれません。 Samba 4特有の SELinuxポリシー作成の完了に関してさらなる作業があるものの、今のところ SELinuxを無効にさせることなく、全てを動作させることができるはずです。 以降のすべてのコマンドのために、次の環境変数を確実に設定してください:
MYREALM="samdom.example.com"
Bind パーミッションの設定:
chown named:named /usr/local/samba/private/dns
chgrp named /usr/local/samba/private/dns.keytab
chmod g+r /usr/local/samba/private/dns.keytab
chmod 775 /usr/local/samba/private/dns
ファイルにラベル付け:
chcon -t named_conf_t /usr/local/samba/private/dns.keytab
chcon -t named_conf_t /usr/local/samba/private/named.conf.update
chcon -t named_var_run_t /usr/local/samba/private/dns
chcon -t named_var_run_t /usr/local/samba/private/dns/${MYREALM}.zone
ラベルの永続化設定:
semanage fcontext -a -t named_conf_t /usr/local/samba/private/dns.keytab
semanage fcontext -a -t named_conf_t /usr/local/samba/private/named.conf
semanage fcontext -a -t named_conf_t /usr/local/samba/private/named.conf.update
semanage fcontext -a -t named_var_run_t /usr/local/samba/private/dns
semanage fcontext -a -t named_var_run_t /usr/local/samba/private/dns/${MYREALM}.zone
semanage fcontext -a -t named_var_run_t /usr/local/samba/private/dns/${MYREALM}.zone.jnl
semanage fcontext -a -t ntpd_t /usr/local/samba/var/run/ntp_signd
NTP パーミッションの設定:
$ chgrp ntp /usr/local/samba/var/lib/ntp_signd
ntp様コンテキストの設定で複数の試みが失敗したので、下記のポリシーがWindowsクライアントがドメインに参加した後の時刻同期のために必要とされました。
$ chcon -u system_u -t ntpd_t /usr/local/samba/var/run/ntp_signd
$ chcon -u system_u -t ntpd_t /usr/local/samba/var/run/
$ chcon -t ntpd_t /usr/local/samba/var/run/ntp_signd/socket
samba4.te ポリシー:
module samba4 1.0;


require {
   type ntpd_t;
   type usr_t;
   type initrc_t;
   class sock_file write;
   class unix_stream_socket connectto;
}

#============= ntpd_t ==============
allow ntpd_t usr_t:sock_file write;

#============= ntpd_t ==============
allow ntpd_t initrc_t:unix_stream_socket connectto;
Checkと loadのポリシー:
$ checkmodule -M -m -o samba4.mod samba4.te
$ semodule_package -o samba4.pp -m samba4.mod
$ semodule -i samba4.pp
Step 11: Permissions, SELinux Labeling and Policy
These instructions are intended for RedHat 6.X, but may serve as a guide for other distributions/versions. There is still more work to be done in regards of creating a Samba 4 specific SELinux policy but for now you should be able to have everything working without disabling SELinux. For all the commands below, make sure you have set the following environment variable:
MYREALM="samdom.example.com"
Bind Set Permissions:
chown named:named /usr/local/samba/private/dns
chgrp named /usr/local/samba/private/dns.keytab
chmod g+r /usr/local/samba/private/dns.keytab
chmod 775 /usr/local/samba/private/dns
Label files:
chcon -t named_conf_t /usr/local/samba/private/dns.keytab
chcon -t named_conf_t /usr/local/samba/private/named.conf.update
chcon -t named_var_run_t /usr/local/samba/private/dns
chcon -t named_var_run_t /usr/local/samba/private/dns/${MYREALM}.zone
Set Label Persistence:
semanage fcontext -a -t named_conf_t /usr/local/samba/private/dns.keytab
semanage fcontext -a -t named_conf_t /usr/local/samba/private/named.conf
semanage fcontext -a -t named_conf_t /usr/local/samba/private/named.conf.update
semanage fcontext -a -t named_var_run_t /usr/local/samba/private/dns
semanage fcontext -a -t named_var_run_t /usr/local/samba/private/dns/${MYREALM}.zone
semanage fcontext -a -t named_var_run_t /usr/local/samba/private/dns/${MYREALM}.zone.jnl
semanage fcontext -a -t ntpd_t /usr/local/samba/var/run/ntp_signd
NTP
Set Permissions:
$ chgrp ntp /usr/local/samba/var/lib/ntp_signd
Multiple attempts to set the context for ntp failed so the below policy was needed for windows clients time sync after joining the DOMAIN.
$ chcon -u system_u -t ntpd_t /usr/local/samba/var/run/ntp_signd
$ chcon -u system_u -t ntpd_t /usr/local/samba/var/run/
$ chcon -t ntpd_t /usr/local/samba/var/run/ntp_signd/socket
samba4.te policy:
module samba4 1.0;


require {
   type ntpd_t;
   type usr_t;
   type initrc_t;
   class sock_file write;
   class unix_stream_socket connectto;
}

#============= ntpd_t ==============
allow ntpd_t usr_t:sock_file write;

#============= ntpd_t ==============
allow ntpd_t initrc_t:unix_stream_socket connectto;
Check and load policy:
$ checkmodule -M -m -o samba4.mod samba4.te
$ semodule_package -o samba4.pp -m samba4.mod
$ semodule -i samba4.pp
Step 12: ファイル共有のセットアップ
準備(provision)は既定ではとても簡素な何も共有しない /usr/local/samba/etc/smb.conf ファイルを作成します(訳注:「with no non-system shares by default」はalpha版の頃の「with no shares by default」として訳しました。プリンタなどのことかもしれませんが non-systemが何を指すのかちょっとわからなかったため)。サーバーを便利なものにするためには、少なくとも一つの共有設定を持つように更新する必要があるでしょう。例えば:
[test]
      path = /data/test
      comment = Test Share
      read only = no
- メモ: 古いバージョンの Samba 4 アルファ版では、新しい共有設定を表示するために Sambaを再起動する必要があります。
Step 12: Setup a File Share
The provisioning will create a very simple /usr/local/samba/etc/smb.conf file with no non-system shares by default. For the server to be useful you, will need to update it to have at least one share. For example:
[test]
      path = /data/test
      comment = Test Share
      read only = no
- Note: In older alpha versions of Samba 4, you need to restart Samba to make new shares visible.
Step 13: プリンタ共有のセットアップ
CUPSで設定済みのプリンターを共有することができます、Sambaはソケットを通じてCUPSと通信することを気に留めておいてください、 ですので、他の設定や、CUPSソケットの listenディレクティブ以上のどんな特殊な権限付与も不要です。
基本的な印刷共有
- プリントスプール用ディレクトリを作成し、適切な権限を付与します。ここには Sambaのドキュメント印刷に関連した一時ファイルが保存されます:
mkdir /usr/local/samba/var/spool
chmod 1777 /usr/local/samba/var/spool
- 以下の内容を /usr/local/samba/etc/smb.conf に追記して sambaがここを使うように設定します:
[printers]
    comment = All Printers
    path = /usr/local/samba/var/spool
    browseable = Yes
    read only = No
    printable = Yes
Point and Print ドライバ
便宜上、Windowsクライアントはサーバーに共有プリンタのプリンタドライバを問い合わせることができます。この機能を Sambaで有効化するには、特別な print$ 共有を作成しなくてはなりません。
- Create the print file share directory, and architecture sub-directories:
mkdir -p /usr/local/samba/var/print/{COLOR,IA64,W32ALPHA,W32MIPS,W32PPC,W32X86,WIN40,x64}
- 以下の内容を /usr/local/samba/etc/smb.conf に追記して sambaがここを使うように設定します:
[print$]
    comment = Point and Print Printer Drivers
    path = /usr/local/samba/var/print
    read only = No
- ドメイン管理者でクライアントコンピュータにログインします
- スタート -> ファイル名を指定して実行 ‘\samba\’
- 共有されているものの一覧から ‘プリンターとFAX’ をダブルクリック
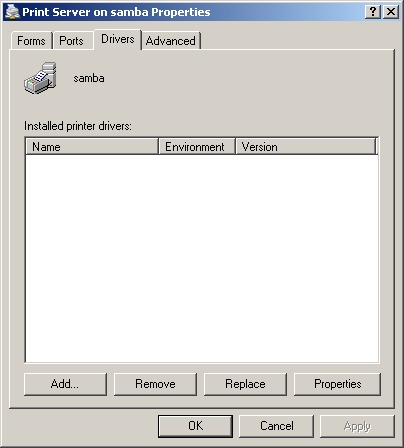
- ファイル -> サーバーのプロパティ をクリック
- ドライバータブで、’追加…’をクリックして ‘次へ’
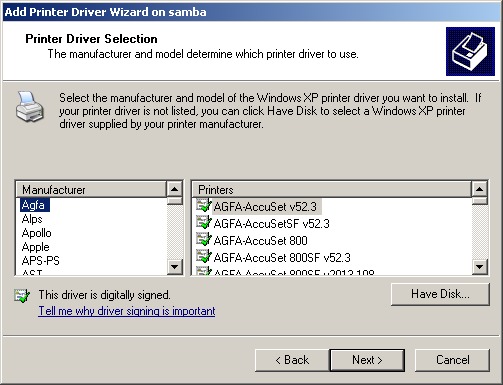
- 次のプロンプトで、インストールしたいドライバを選択して、’次へ’をクリック
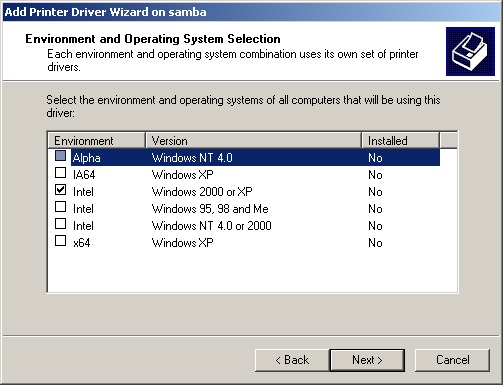
- インストールするドライバーのアーキテクチャを選択してください。
あなたが選択したアーキテクチャのドライバがクライアントコンピュータにない場合、ドライバーディスクを提供するように求められるので注意してください。
- サーバードライバーダイアログを閉じます
- (このドライバの)プリンタを右クリックしてプロパティを選択します
- 詳細タブのドライバの変更ドロップダウンボックスからインストールしたドライバを選択してください。
メモ: ファイルシステムサポート
この情報は
Samba_4_OS_Requirements#File_System_Support にあります。
Step 13: Setup a Printer share
You can share any printers already configured with CUPS, keep in mind that Samba communicates with CUPS via sockets, so you don’t need to set any configure any special permissions beyond a listen directive for the CUPS socket.
Basic Print Sharing
- Create a print spool directory, and set the permissions properly. This is where Samba will store temporary files related to print documents:
mkdir /usr/local/samba/var/spool
chmod 1777 /usr/local/samba/var/spool
- Configure samba to use it, by adding the following to /usr/local/samba/etc/smb.conf:
[printers]
    comment = All Printers
    path = /usr/local/samba/var/spool
    browseable = Yes
    read only = No
    printable = Yes
Point and Print Drivers
For the sake of convenience, Windows clients can query the server that is sharing a printer for a print driver. To enable this functionality in Samba, we have to create a special print$ file share.
- Create the print file share directory, and architecture sub-directories:
mkdir -p /usr/local/samba/var/print/{COLOR,IA64,W32ALPHA,W32MIPS,W32PPC,W32X86,WIN40,x64}
- Configure samba to use it, by adding the following to /usr/local/samba/etc/smb.conf:
[print$]
    comment = Point and Print Printer Drivers
    path = /usr/local/samba/var/print
    read only = No
- Log in as a Domain Administrator on a client computer
- Click Start -> Run ‘\\samba\’
- In the list of shares, Double-Click ‘Printers and Faxes’
- Click File -> Server Properties
-
On the Drivers Tab, Click ‘Add…’, then ‘Next’
-
In the following prompts, choose the driver you would like to install, and click ‘Next’
-
Choose the architectures you are installing the drivers for. Be aware if you choose an architecture that the client computer does not have the driver for you will be prompted to provide a disk with the drivers.
- Close the Server Driver Dialog box
- Right-click on the printer the driver is for and choose Properties
- On the Advanced tab, change the Driver drop-down box to the driver you just installed
Note: Filesystem Support
This information has been included in the
(まだ翻訳中)
大変参考になりました。特に、samba-toolでRealmの部分が他のサイトではサーバのホスト名と同じにしてあるため、エラーが発生し、原因究明に四苦八苦していたら、偶然貴サイトにめぐり合い解決しました。サーバのホスト名ではなくDC専用のドメイン名を作成するのですね。うまく行きました。感謝。
>堀正和さん
コメントありがとうございます。お役に立てたようでなによりです。
続きの翻訳の目途はたっていませんが機会があればまたご利用ください。